DISCLAIMER: This is not a tutorial for a specific map or captain class. It should help most Captains understand the basics of Star Traders Frontiers, but will not cover everything that is found in the game. If you choose to play on a difficulty with Perma-Death (Good on you!), it will not keep you from dying, but that's ok, because death is the best teacher. Lastly, this guide is going to ignore the story. That's not saying you can't try to use it alongside the story, there just won't be any reference specifically to it here. And, if you really want to enjoy the story, it might be good to try out a few test Captains first, because learning all the ins-and-outs of STF and trying to save the galaxy at the same time could just cause your head to explode.
For an alternate take, see: Starting Crew Guide
We won't spend time on Captain creation right now. It's mildly complicated and you might as well just choose a ready-made template. For now, just select a template with a high Experience rating (Bounty Hunter is a good choice, even if you probably don't want to start out doing bounty missions) , this will give you more talents to work with out of the box. Also, right now you really don't want to check "Manually Assign Talents." Let the game pick starting talents for all of our crew. It does a reasonably good job.
Assuming you've made it through character creation and map generation and read through all the story stuff and now you find yourself sitting in your ship above a system, wondering what in the galaxy you're supposed to do. Though there are story elements in Star Traders Frontiers, at its core it's a big sandbox game, which means you're given a wide latitude to do whatever you want, or at least whatever you're capable of doing with the resources that you have.
Money
One of the most important resources that you have is credits, cash, dineros, yen, that stuff. You'll see your current credits listed at the bottom left of the screen and, depending on your difficulty and ship choice, you might have quite a few or just barely enough to keep you alive for the next couple of days. Regardless, you're going to need those for lots of things, like paying your crew, buying gas for your ship, paying for trade permits, fixing your ship, fixing your crew, buying stuff to sell for more credits, keeping your crew happy, improving your ship, keeping your crew from throwing you out the airlock (yeah, your crew likes your credits quite a lot), buying ranks and edicts and on and on. So the first rule of Star Traders Frontiers is, Don't Run Out of Money! Seriously, you might not be able to die on lower difficulty settings, but you can still end up broke in a Starport without enough credits to fix and gas your ship. So, while getting lots of money may or may not be your ultimate goal, making sure you don't run out of it is probably something you should be worried about right now. On higher difficulty levels, it's not always possible, but a decent goal early on is to keep a cushion of about $20,000. Don't spend that on upgrading your ship or meeting exotic new contacts or buying trade goods unless you're making a very short trip through friendly territory. Eventually you'll want to keep a cushion of $50-100k to recover from a bad combat or as operating reserves for long missions or big trades.
Crew
You're probably wondering about how to make money then, we'll get there, but first we need to talk more about your crew (while they talk about how to separate you from your money). Your crew are your second most important resource in the game. Let's face it, traveling around space in heavily armed metal tubes powered by hyper drives is inherently dangerous and you can't do it alone. So, one of the first things that you should do is to look at your crew.
Frank talk about skills
Skill Pools
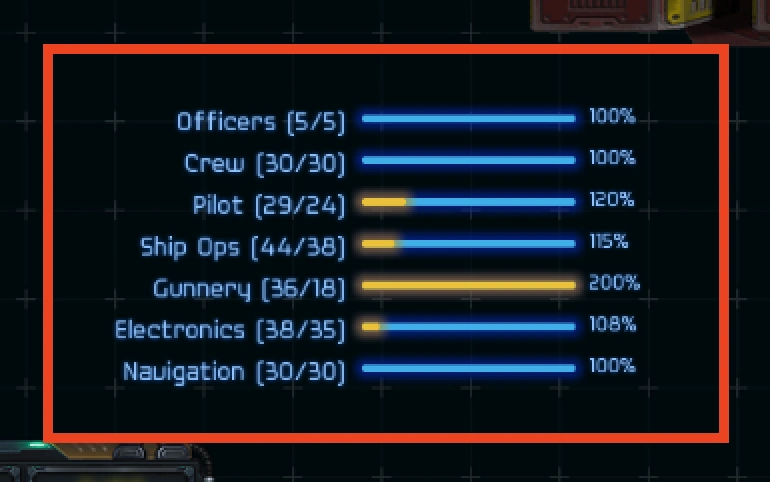
Before actually looking at your individual crew though, let's look at your ship and its skill pools. Click on the "Ship" button near the bottom right. You should be looking at a picture of your ship and a listing of all its statistics. On the right you'll see some blue bars that represent certain skill pools of your ship. If you look at a line you'll see something like "Pilot [22/16]" then a colored bar and then a percentage. In this case followed by the number "138%." To break these down; "16" is minimum pilot skill needed to capably fly your ship. That number is derived from all the "Pilot" supplied by the components of your ship. That number can be increased by upgrading ship components, but that's not really important just now. "22" is the number of total Pilot Skill Points provided by your crew. In this case, you're meeting your need for Pilot Skills. What's important to know here is that you don't ever want to be below 100% on any of these skills. You will be severely punished in the upcoming tests if you fall below 100% because your crew is essentially not meeting the piloting requirements of your ship. You should also know that anything up to 200% will help you in things that test your piloting, though not as much as the original 100%. There is no benefit to having skills over 200%. As you approach 200% you should think about upgrading your components to make the best use of your crew skills. As you get going it's important to keep an eye on your skill pools. If you're low, you can recruit the appropriate crew type at most Spice Halls. Your crew is also contributing skills to other pools which are found just below the blue bars and begin with "Command:" These skills are important as well, but don't have to be balanced with ship components in the same way.
Back to Crew
So now that you know something about skills, let's look at your crew. The "Crew" button is just to the left of the "Ship" button at the bottom and should have a little bouncing ball on it to get your attention. That bouncing ball means you have Jobs or Talents to choose for your crew or officers. On the crew screen, you'll see a list of all your crew members, beginning with your Captain, followed by your officers, on down to your lowliest Crew Dog.
When starting a new game, depending on your template choices, your Captain and Officers may have some Job and Talent points to spend. You'll know who is ready to level by the little golden chevron marker next to their image (later you may want to use the filter "Leveling" to quickly find leveled crew and assign points). If you chose the Bounty Hunter template, your Captan and Officers will each have one job already and some job points and talent points to spend. Most of the time, you will start with three officers who will be a Doctor, a Quartermaster and an Engineer. If you ship provides a fourth, they will be a Navigator or Gunner. Officers are unique because they can train in up to three jobs, while regular crew can only have a single job. Officers will also get more job and talent points to spend. So first, let's spend those job points you have. To keep this simple here, let's give each of your Officers (and, depending upon your starting character template choice, your Captain) a second job.
Click on one of them. If they are ready to be leveled-up then there will be a button that says "Train Job" in the top-rightish corner. Click on this and you'll see a list of possible jobs that they could cross-train into. The jobs we want to add are Combat Medic (to your Doctor) , Smuggler, Spy and Merchant. Feel free to look at the officers and their stats and see if any of them might have skills that would fit with any of those particular jobs. At the moment, however, it's not ultimately important who gets what job. If your Captain already has one of these jobs, either pick another one or just increase the level of the job he or she has.
Jobs determine what Talents an Officer or Crew member can learn. As they increase their Job level new talents become available in that class. Once you've assigned your extra jobs, go ahead and look at the talents screen of your captain and officers. If you had checked the "Manually Assign Talents" box during character creation, then you would have to chose new talents for every single member of your crew right now. If you chose Bounty Hunter, you can choose 3 talents for your Captain, one for your Doctor, Engineer and Quartermaster and 2 for your Navigator because they won't have any pre-chosen talents. Feel free to look at the different talents—there are a lot of good options. Early on though, with the jobs that you've chosen, you're going to want to get a few key talents. For your Doctors/Combat Medic get Medical Staff and First Aid. For your Merchant get Market Confidant and Wise Counsel if you can. For your Spy get Sly Move. For your Smuggler get Hideout. If you chose Bounty Hunter get Unwavering Attention or try to find some other way to get an Intimidation save Talent. Lastly get Exacting Design from your Navigator. Use any other talent points as best as you see fit. If you don't have enough talent points, get the preceding talents the next time they level up. We'll get to why these things are important soon.
If you want, feel free to take some time to look at the rest of your crew. To start off with, you should have a pretty balanced load of basic crew that will meet all the skill requirements of your ship. You'll notice that they have different traits, some positive and some negative. You'll notice their attributes as well. Attributes are not as important for regular crew as skills, though they do help determine things like Morale and Hit points. As the game progresses, your officers and crew will continue to level up and gain talents. Allocate these as best as you see fit, giving special attention to getting a good number of the skill save talents early on. By now, you're probably getting eager to start flying and making money.
Take a Mission
There are numerous ways to make money in STF, but one of the surest ways, especially early on, is to do Missions for your Contacts.
Though this guide isn't going to follow the story, you will start with an existing passenger transport mission, related to it. We might as well at least do this one because it pays well and will introduce you to another Contact. If you haven't already, get back to that first screen you were looking at with your ship above a planet (this is known as the Quadrant Map). First, you may notice that there is a line going away from your ship to another planet. This indicates that you have a waypoint set and in this case it's leading you to your first mission step. Before you hit "Navigate" though, click on the little three-way-arrow "Mission" button on bottom left. It will also have the little bouncing ball indicating that you have an active mission. From this screen you can always find what missions you may have and navigate to the next objective in them. Hit "Navigate" now and off you'll go to pick up Arbiter Brokstrom. It should pretty easy to follow the steps of this simple passenger deliver mission. Once you drop Estelle off and click through all the dialogue you can feel free to ignore the story, but know that Calagan Faen will operate like a normal contact too and offer you random missions.
As a side note, once you start flying around, it is important to take care of your ship and crew at each starport. Make sure you're hitting the "Refuel, Repair, etc." buttons each time you visit a zone. We'll talk more in depth about these soon.
Outside of the story, all of your missions will come from contacts. Along with cash, missions also provide you with Reputation with your contact and his or her faction and they will also increase your contact's influence, allowing them to offer you better services in return. If you look around at the different systems on the quadrant map, you will notice that some of them have a little round, orange icon with three people on it. That tells you that you have a contact in that system. You can also use the Contact Button (lower-leftist, blue with those same three people), to see all of your known contacts and learn more information about them.
To get more missions you're going to need to visit your contacts. If you haven't already, click on the Contact Button and bring up the Contact Screen. On the left is a picture your contacts, their name, contact type, faction and your reputation with them. Clicking on each one will bring up more detailed information on the right. Look through your contacts and find the closest one that offers missions, which is one of the first things listed on the right. You can also keep working for Calagan Faen. Once you've found one, click on the "Action" on the top left and select "Set Waypoint" and return to the Quadrant Map and hit "Navigate."
When you land on the zone with your contact, they will be displayed in the lower left corner. Clicking on them will bring up all the services they offer. Look for the box that says "Missions" and click on it. You can read the text there, then click on "Mission" in the "Proving Your Charter" box. A mission offer will appear on the left. Clicking the "Mission" button again will give you another mission so you have some choice about what to take. With more reputation a contact will offer you more missions to choose between and you'll also be able to take more than one mission at a time. Unless you're following the story, you will be offered some pretty easy delivery missions at first. Look at the offered missions and then use the "Actions" button on the top left to take one of them. If there is a "Return Shipping" mission choose this one.
Completing missions is pretty straightforward, especially these early ones. When you get to where you're going there will be a Mission tab on the bottom left of the screen very similar to the Contact tab. After taking a few delivery missions, you will probably see some more variety and farther away missions appearing. A few things to note. If a mission involves Spying, Patrolling or Blockading, they will be completed in orbit of a zone. You'll see the same mission tab appear there. Also it's probably a good idea to avoid missions that involve ship combat early on. If you're on a very low difficulty and put your Experience at priority A and Ship at priority B it may be possible, but most of the time it's best to wait until you've upgraded your ship a bit and have a decent reserve of cash for fixing it up.
Missions are just one (very good) way to progress in the game. There's nothing wrong with focusing exclusively on them, especially if your goal is to be a Hero of one faction or another. You will probably want to specialize your ship and crew for completing certain types of missions. In STF, there is nothing preventing one type of Captain from taking another type's missions, so as you play it's important to read the text and take note of what skills are being tested. If there is a type of mission you prefer, build up your skills and talents in that direction.
Flying is Fun (if you don't die)
Deep Space Events
The Status Bar will alert you to serious problems with your ship and crew.
So taking a Mission is going to require flying around the quadrant a bit. One of the first things you'll notice as you fly is the scrolling Event Log near the bottom right. Perhaps surprisingly, flying around space is pretty dangerous. Pipes burst, reactors overheat, micro-meteors and non-micro-meteors pummel your ship, tempers flare, orders are questioned and eventually chairs get thrown and then somebody raids the weapons locker and it's all over. That scrolling log gives you some insight into all these things and how your crew is dealing with them. So the second rule of Star Traders Frontiers may be, Pay Attention to the Event Log and Adjust Your Crew to Pass Those Tests!. Every time you fail one of those tests something bad is happening to your ship; it is being damaged, crew are being wounded or killed or they are losing morale. This is why we spent time talking about skills above and many of the Talents we chose were to give us auto-saves to pass those tests. So as you fly around, watch the log and pay attention to what you're not passing and also what auto-save talents you're relying on most heavily. Ultimately, you want to get your crew to a place where they never fail a test. As your crew levels, adjust their skills, jobs and talents to get what you need to pass those tests. You may even need to upgrade your ship components to help you build a strong dice pool to do it.
Ship and Crew Management
Zone Services from top to bottom; Fuel, Repair, Doctor and Spice. The orange circle shows you have a contact here.
There is already a good guide to Crew Management which gives a lot more detailed info than will be provided here, but let's look at the basics. All that flying around, not to mention any other activities you engage in are going to take a toll on your ship and crew. They will be damage and injured, maybe even killed or worse than that, your crew may get unhappy through low Morale and abandon the ship when you land or even rise in Mutiny against the Captain. The good news is that most of these can be corrected if you pay attention to what is happening and give adequate attention to your crew. Keeping an eye on the Status Bar will let you know when it's time to give your ship and crew some TLC.
Zones (planet locations) provide services you will need to patch up ship and crew, but not all zones provide all services so you will need to get familiar with those little white circles by each zone. From top to bottom they are Fuel, Repair, Doctor and Spice. If the circle is empty, the zone does not offer this service. Fuel and Repair are accessed through the Starport once landed. These obviously will keep your ship happy and in good shape. Doctor and Spice are provided at the Spice Hall. It is important to note that HP and Morale, which can be recovered at the Doctor and and by spicing respectively, are limited by certain ratings which you can read more about under Spice Hall Services. This matters because if you are visiting planets with very low Spice or Government ratings you may not be getting maximum HP or Morale recovery, thus setting yourself up for more problems as soon as you fail the next event test or enter combat.
Spice Halls are also the place to recruit new crew members. As crew members die or desert, or you increase your crew capacity you can look here to hire many of the basic crew types. Not all types are available from all planets so you may need to look around to find just the right crew. More specialized crew may also be recruited from various contacts. If a contact offers certain crew this will be listed in their description in the contact menu. It is very important to recruit if the Status Bar is indicating that you are understaffed on certain skills, which can happen easily if you lose crew early. If these indicators appear proceed to the nearest zone to make sure you are 100% staffed.
Encounters
While you are flying around space, you're likely to bump (metaphorically we hope) into other spacefaring ships. Most of them are much like you, a Star Trader pursuing whatever ends they have chosen as a means to greatness and glory. Many of them will be relatively peaceful, but for some of them greatness may included robbing humble merchants or scuttling enemy faction ships (have you made any enemies yet?), or maybe that's your definition of greatness? Either way, when you encounter a ship a screen will appear with various options. First, next to the flag of the quadrant owner will be a description of the ship, its type and faction, and then its hostility rating. Type and hostility ratings are going to determine the options you have in a given situation. You'll see that their initial hostility will be modified by various factors including the quadrant owner, the enemy captain's faction, and possibly quadrant rumors.
When you're just getting going it's important to know that STF combat can be very brutal and unforgiving. This is no side-scroller where one hero plows through legions of enemies. The enemies in STF have parity with the player, so it will take some serious strategy and focus to make fighting profitable. Early it is best to avoid fighting when possible. So if you have the option to Acknowledge, that is great (this requires positive rep with the other faction). If you have the option to retreat, that is good too. Depending on enemy ship type and faction, retreating may cause minimal rep loss with them. This can often be avoided by bribing the opposing captain, but you'll have to decide what's more valuable your rep or your money. You may also have the option to surrender if you are facing captains such as Military Officers, Pirates, or Bounty Hunters. It can be painful to hit surrender, but it's pretty important to figure out how to do that early on. Fighting every ship you come across instead of surrendering is a recipe for disaster. Surrendering to Pirates will most often result in you losing all your cargo. The same may also be true for other captain types if you're carrying non-permitted goods in their territory. With repair bills going up to 20,000 for a bad fight it is often cheaper to lose a load of cargo.
If you don't want to lose that cargo, or you have no other option but to fight, it may be best to escape immediately from combat. There's a whole guide on ship combat, so it's sufficient to say here that if you want to escape, when you start combat select "Escape" as your move, you might as well fire a few torpedoes in case you don't escape and then use a Talent such as Sharp Steering that will increase your escape chances. If you think you're up for it and you really want to fight we'll talk more about that soon.
Hopefully, by this point you're starting to get the hang of doing some basic missions, flying around the quadrant, maybe even making a Hyperwarp jump, and keeping your crew mostly happy and alive while doing so.
I thought this game was about Trading?
At this point you might be thinking "I bought this game because I thought it was a space trading game, maybe I can still get a refund?" Don't be too hasty though. STF has a rich economic engine along with all the other things going on. For those who want to be a big fat happy merchant shuttling goods around the galaxy to all your friends and contacts you won't be disappointed. You'll just need to understand the Trading system a bit. Even for non-merchant Captains understanding trade to supplement your other activities can greatly increase the profits of a particular mission. Trading also has some advantages over running missions or other activities. If you avoid trade conflicts, it can gain money without destroying rep with other factions, and with Garner Favor a level 5 Merchant Talent it can even gain you rep. Trading can also be done almost anywhere and at any time, unlike mission which can often require just the right contacts.
Supply and Demand
The primary driver of trade is supply and demand. Certain zone types create goods that other planets want and also demand goods that are, in turn, produced by other zone types. When visiting an exchange you will be presented with a list of goods that are for sale on that planet. These are determined by the zone type (farming, industrial etc.). You'll notice that each good shows the price it is for sale at, the overall range of prices it is sold for around the galaxy and a letter grade. The letter grade basically shows how low or high the good is priced on that planet in relation to what is sold for on all the other planets. So generally buying things at A's and B's means you getting it at a pretty high value. It should be noted though letter grades do not tell you much about the overall margin of a trade. Filling your hold with Biowaste at letter grade A won't net you nearly as much as a half hold of Clothes bought at letter grade C, in most cases. Lastly, when you click on a good it will tell you which zones that good is generally in demand on. So a good practice, if you have a mission, is to look at the target zone type for that mission. Say it's an Industrial zone. You then want to look for goods are demanded by Industrial zones and fill up with as many of those as you can, especially the ones that fetch the highest prices. You're already flying that way, might as well not fly with an empty hold.
When you land on a planet with goods in your hold, the exchange screen will immediately open up to the "Sell" view (tabs on the bottom). You'll see your goods and just like the buy screen you will see their price on that planet, the range and a letter grade. You will also see the profits or losses you stand to make on those specific goods based on the price you bought them for. High letter grades mean "This is a good place to sell this" lower letter grades mean "you might be able to do better somewhere else." Though it's rarely worth traveling all over just to find the best price, if you can sell now for a profit and buy something else to sell. Remember flying takes water-fuel and crew wages which can eat into your profits quickly.
A few quick trade routes that can be done early without permits are:
Mining -> Refining -> Industrial, Orbital or High Tech Industrial -> Population or back to Mining/Refining.
Farming -> Population, Refining or Industrial -> back to Farming
It's important to know that trading will affect the levels of supply and demand in a zone. Both buying and selling will drop the price of goods, which means you can't keep running the same route over and over again. You will need to keep moving around, trading different goods to different planets, and visiting other quadrants to trade as well. Eventually supply and demand levels will return to what they were and you can return to your original trade routes while the others resupply. A final note about supply and demand is that factions like exotic goods. Trading across faction lines increases profits by 25%.
Permits and Legality
You'll probably see early on that different exchanges offer a lot of goods that are Permit Restricted. Permits are what factions use to control the trade of more lucrative and dangerous goods. To trade these goods, you'll need a Trade Permit. There are up to 4 levels of Permits that can be bought from a Contact. You'll need higher reputation to buy the various levels of Permits, but they are generally always worth buying. Permits only apply to the faction that issues them. So an Alta Mesa permit won't help you at all in a De Valtos zone. Merchant players will want to prioritize getting level 3 permits. Level 4 permits are a little risky because not only are they quite expensive, but any reputation loss with the faction the permit was licensed from will cause the permit to be revoked (with some rare circumstances with ultra-high military ranks or edict ranks preventing this.) Non-traders will probably still want level 2 permits with most of their friendly factions.
If you've bought goods and landed at a planet you may have also discovered that you can't sell some of them because they are illegal. Legality is completely unrelated to Permits and is a stat specific to each Zone. Each Prince sets the trade laws of his world to determine what can be bought and sold on his or her world by star traders. Early on, be very careful buying low legality goods (say 6 and below) as they can be hard to find a planet you can sell them on. If you end in this situation you need to look for low Trade Law planets (Tradeway Zones are typically good) or Indy planets, which generally have lower legality. Sometimes you may even need to sell at a loss or stash goods in wild zones to empty out your hold to buy more salable goods. Illegal/non-Permitted goods can also be stashed in a Wild Zone until a suitable market is found for them or a special rumor lowers the legality level.
The Golden Rule for Legal Trades is:
[Good legality ≥ Zone Trade Law] + [Good permit level ≤ Captain's Permit with the Faction] = Legally Salable Goods
Smooth Operator
Now you've got two ways (missions and trading) to keep your captain from being a sad broke-ass spacer haunting a foreign starport begging for handouts from princes and fellow Star Traders. The good news is, there are still lots of other that you can be doing to keep the game interesting and the credits rolling in. There are 4 or 5 other things known as Operations that can generate revenue, add diversity and also play a part in completing missions. These are Spying, Patrolling, Blockading, Exploring, Salvaging and arguably using Black Markets. By now, you've probably noticed the first three as options when in orbit of a zone. Exploring is done on the surface of a wilderness zone and accessing Black Markets is done through contacts that offer it as a service. All of these Operations use a card game to give the player different positive or negative results. Black Markets are somewhat different in that the game is not so much an end in itself, as the point is to access a market where you can then buy and sell otherwise restricted goods.
Since each of these operations are already explained in full detail in their own articles we're just going to hit the important points for a newer player and talk about how you might incorporate them into an overall strategy for greatness. Each Operation really allows a player to play a specific character role , because each game brings unique risks and unique rewards. As a long-term goal the player may want to build towards really dominating one or an other of these activities. In the early game, however, the player needs to be careful about biting off more than they can chew. The good news is that you can take a look at any of the hands before you decide to play them. So early on, what you want to be looking for is low hanging fruit. As you fly around and stop at various systems. Take a look at the hands you are offered. If they have a good ratio of risk to reward, and no extreme risks give it shot. If the risks are too high or there is little to gain then it's time to fold and look for a better hand. Note that viewing orbital operations' "hands" will make it so you have to spend fuel/time to land on the planet or station, even if you had just landed there.
As you fly around trying your hand at all the hands you're given, start paying attention to the game, its risks, rewards, planet stats and rumors that affect them. If you're enjoying one, start building your Captain and crew towards specializing in those games. There are Talents that will allow you to modify the hand that you are given, by re-rolling, removing or improving the cards you are dealt. Refer to the article on each Operation to figure out how to get better at them.
[Guide]