This page explains the basics of Ship Combat. For more in depth strategies see Ship Combat Strategies.
Willingly or unwillingly every Star Trader Captain will have to engage in ship to ship combat during their career. For some it will only be with the thought of escaping as quickly as possible and for others combat will be sought out with dreams of illicit riches, pursuit of glory, or bitter vengeance. The possibility for combat exists any time the captain encounters another ship while navigating the void. In the initial encounter screen various options will be presented to the captain depending on the other ship's type, Faction conflicts, rumors, Faction Reputation, and available Talents which factor together to determine contact's hostility. If the result of the encounter is combat, the captain will immediately be brought to the Ship Combat screen.
Ship Combat Screen[ | ]
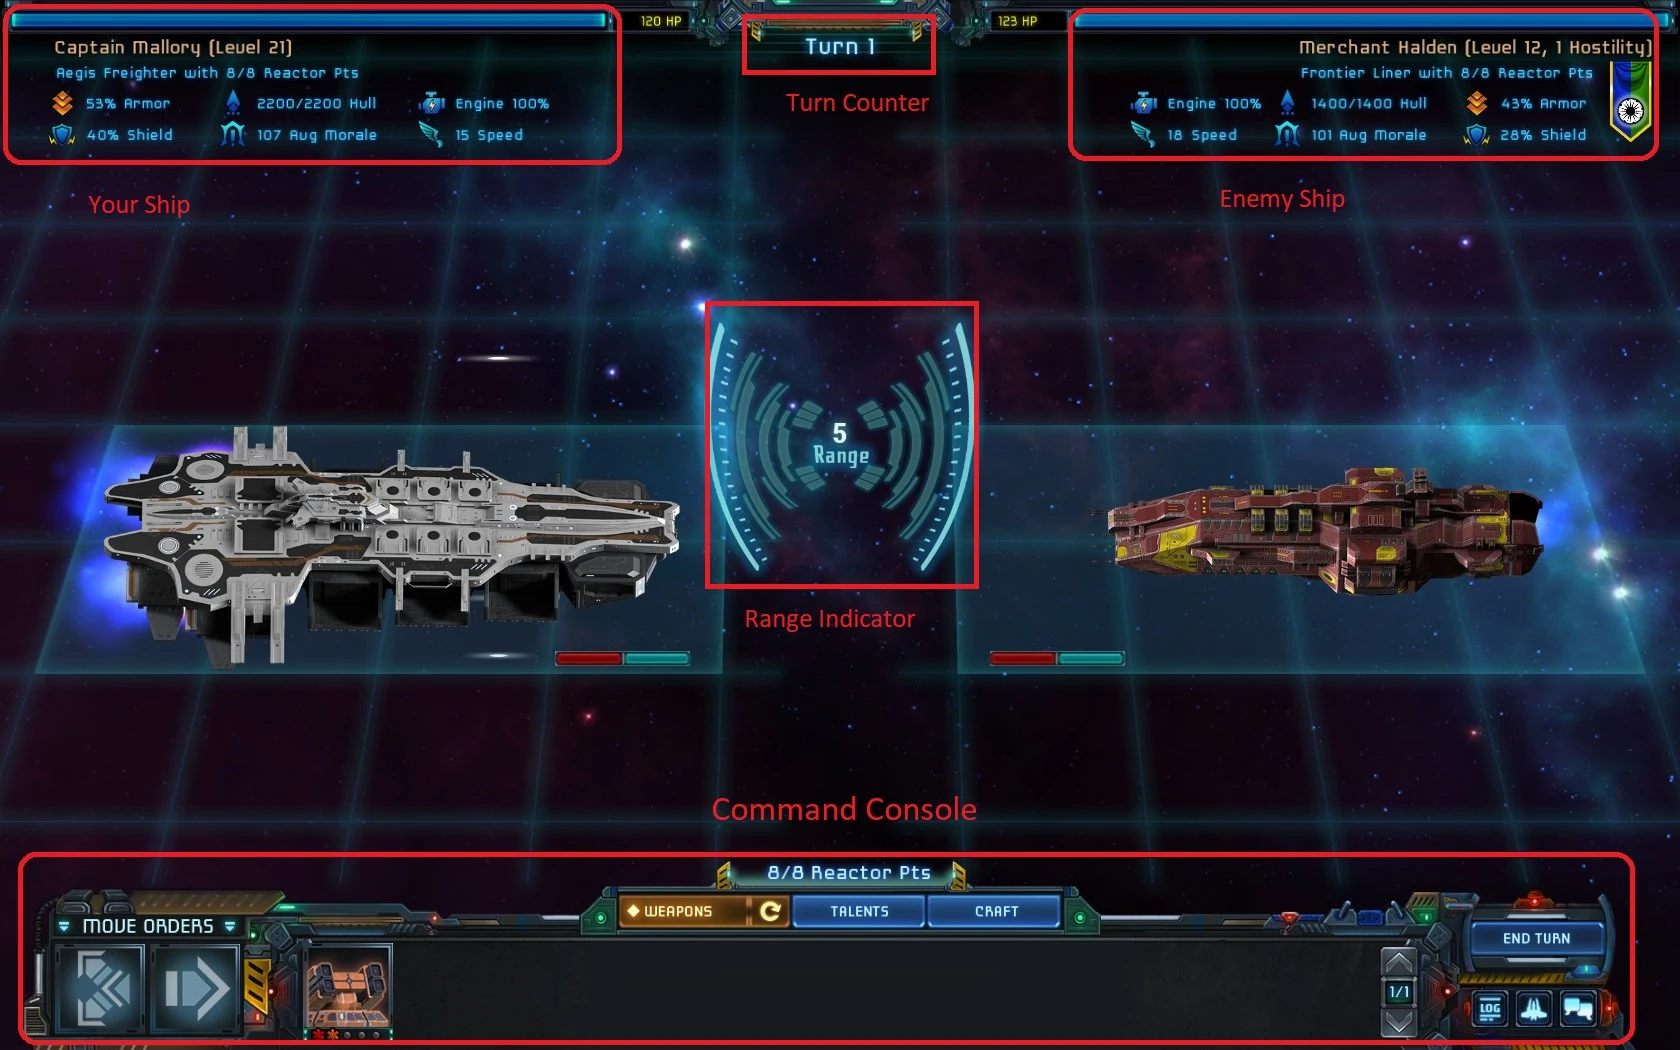
The player's ship will always be on the left and the enemy ship will always be on the right. Each combatant's key statistics are found above their ship and the turn and ship range indicators are placed between them. The lower part of the screen hosts the Command Console, which the captain will use to give orders to his crew. Ship Combat is turn based, with each captain giving simultaneous orders which are then resolved at the same time, when the captains select the End Turn button. Each turn, the captain can give three types of orders; move orders, weapons orders, and talents. Each of these orders may consume Reactor Points, so it is up to the Captain to decide how he or she will use the Reactor Points the Engine generates.
Movement and Range[ | ]
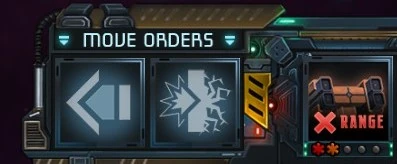
Move Orders
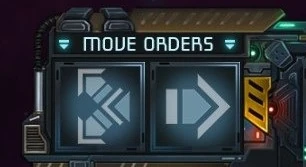
The first order a Captain will be asked for is move orders. These orders will affect the distance between the two ships, known as the combat range. This is indicated by the rangefinder, displayed between the two opposing ships. Range varies from 5 (farthest) to 1 (closest). It should be noted that distance between ships on screen will not actually change. Only the range indicator will tell the player how far apart the ships are. Captains will be given the choice to either advance or retreat, both of which cost Reactor Points. Issuing movement orders is not mandatory, and can be skipped. This is regarded as attempting to hold distance and will not cost reactor points, freeing up more points for weapons. Since both ships are issuing separate and possibly opposing move orders the final results will be determined after the End Turn button is pressed, and after all Talents and attacks have been resolved. Depending on the skills of the Captains and the stats of their ships, it is possible that range will be held, gained or lost.
At each end of the range spectrum special options are given. Combat starts at range 5 and a retreat order at this distance is an attempt to escape combat. If successful, combat will end. If unsuccessful however, the other ship may be able to hold or even gain range. At range 1 the captain can issue a Boarding order. If successful, this will result in Crew Combat, as his or her ship sends over a boarding party to raid the enemy crew, killing some and, if victorious, allows the ability to directly damage the enemy ship components. Certain talents can also allow for boarding at ranges greater than 1.
Beyond escaping and boarding, range is important because various weapons only function at or function better at certain ranges. Depending on the stats of the ships and weapons he or she has equipped, each captain may have an optimal range from which they prefer to do combat.
Range Change Mechanics[ | ]
When both captains are moving toward each other or both are moving away from each other at the same time, no rolls are performed and the action is successful. However, when the two ships do not "agree" on the movement action, one or more range change rolls is made.
| Player Action | Opponent Action | Rolls Made | Result State |
|---|---|---|---|
| Increase Distance | Increase Distance | None | Distance increased |
| Hold Position | Increase Distance | 1 Roll | Same position (opponent fail) or distance increased/draw (opponent success) |
| Close Distance | Increase Distance | 2 Rolls | Same position (both fail or both succeed), distance increased (opponent success only), distance closed (player success only) |
| Hold Position | Hold Position | None | Same position |
| Close Distance | Hold Position | 1 Roll | Distance closed (player success) or same position (player fail) |
| Close Distance | Close Distance | None | Distance closed |
| Any | Twitch Surge | None | Distance closed 1 or 2 positions |
Note that closing distance at range 1 is impossible -- it is replaced with a boarding action. If you attempt to board while your foe retreats, it is possible for you to pass your boarding roll (and get a boarding battle) while the enemy retreats successfully if they pass their range change roll. After the boarding combat, you will resume ship combat at one more range than you boarded from.
Also note that increasing distance while in position 5 results in a draw and the end of combat.
If both sides Twitch Surge and only one of the pilots involved roll for a double-move, the double-move is always the result, even though one rolled a single move.
Weapons[ | ]
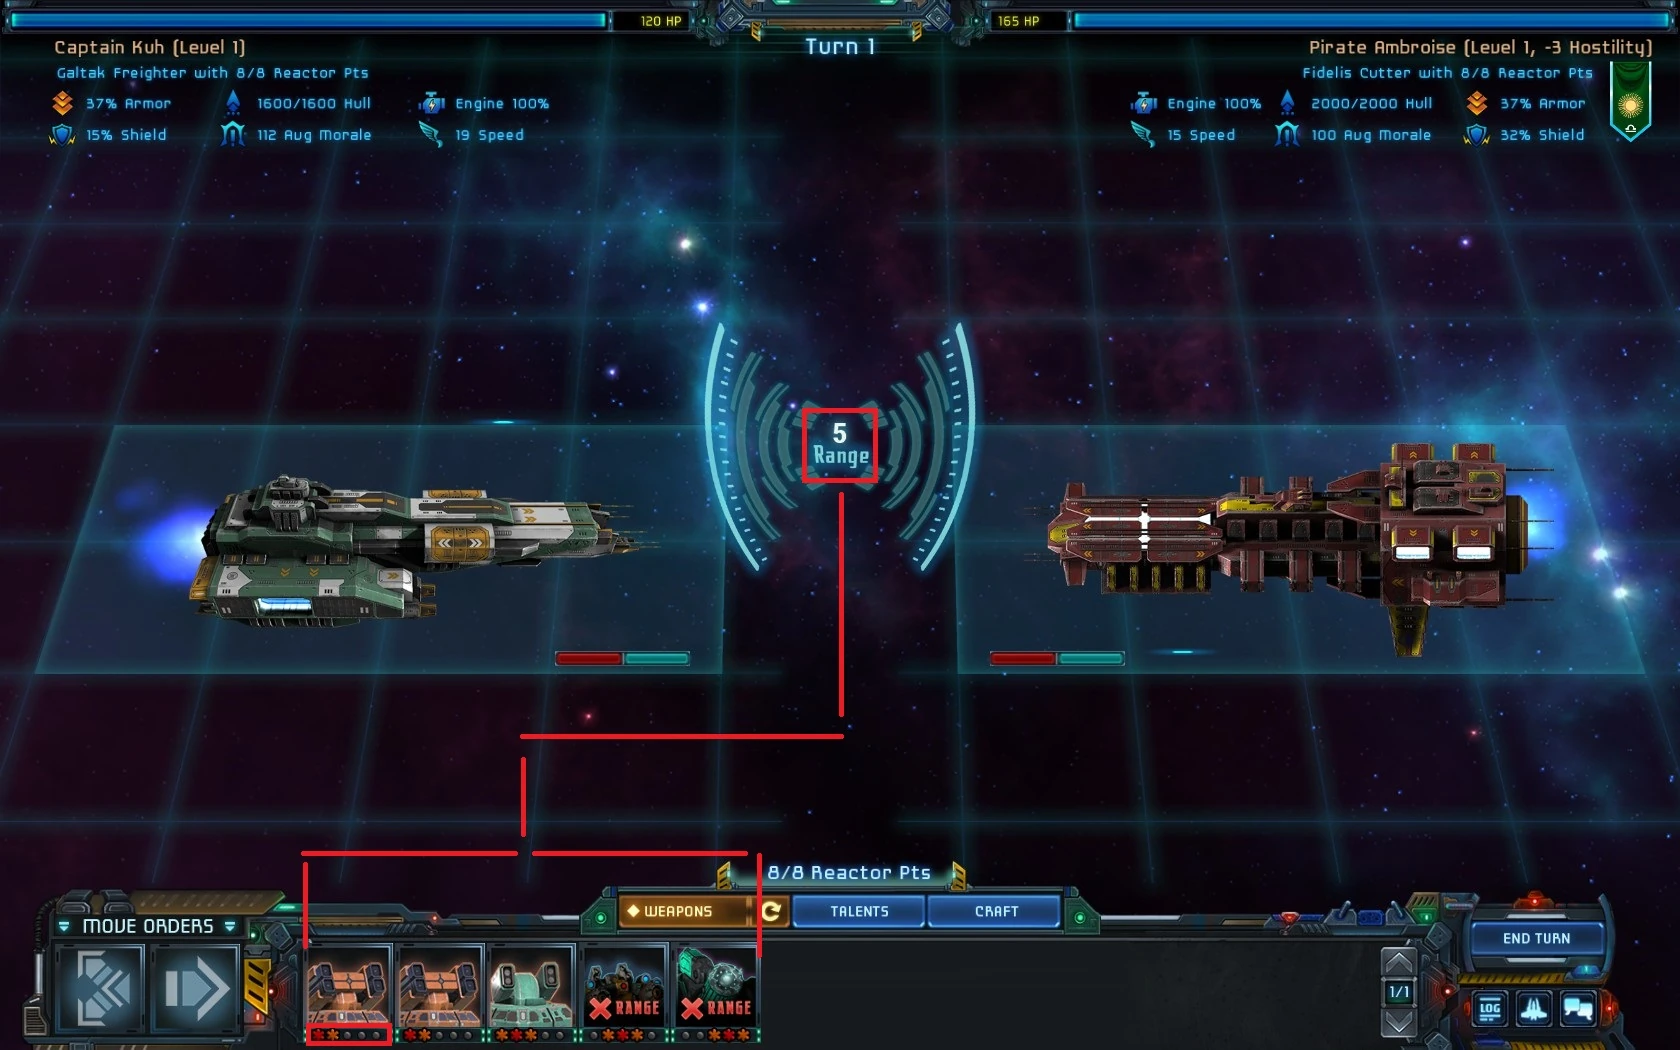

You may choose to fire one or more weapons per Turn. Each weapon costs a certain number of your limited Reactor Points to fire. Weapons are also limited by range and you may only give firing orders for weapons that are valid at your current range. Ranges at which a weapon can fire are indicated by red dots below their icon, with grey dots representing the ranges they cannot be fired at. Every weapon also has an optimal range at which it performs at its best, with no penalties to accuracy or damage. This is indicated by the lighter orange dot(s) below the icon. The dots correspond with the different ranges from left to right. The leftmost dot is range 5, and the rightmost dot is range 1. In the image immediately above, the currently selected torpedoes can be fired at ranges 5 and 4, with 5 being the optimal range. The Railgun to the right can be fired at ranges 4-2 and its optimal range is 3. Because the ship is currently at range 5 the Railgun shows the "X Range" indicator.
Successful attacks may result in crippling effects being placed on either the player's or the enemy's ships. These will appear as little icons just below the image of each ship, which can be viewed by a mouse hover or tap. Some crippling effects can be caused by weapon damage alone which is based on the weapon's damage type. Others debuffs require the the use of Talents and a successful hit with a weapon.


Talents[ | ]

You may choose one Talent per Turn to use. If the Talent is a Buff or a Purge, it is applied immediately at the start of your Turn and effects all movement and firing orders for the turn. Some Talents are limited by range and you may only pick from Talents that may be used at your current range. Some Talents will provide buffs that can also increase reactor points. All buffs and debuffs stack. So multiple uses of the same buff continue to increase effects until each application of the buff expires. An info button is located near the bottom left side of the command console. It will give you info about the talents you have selected.
The move and talent orders you have given will be displayed on the left side of the command console. You may also continue to use the "Move Orders," "Weapons" and "Talents" buttons to modify any orders. When you are satisfied with the orders you have given choose "End Turn" on the right side of the command console. The enemy Captain will complete their orders, all orders will be processed and combat will ensue.
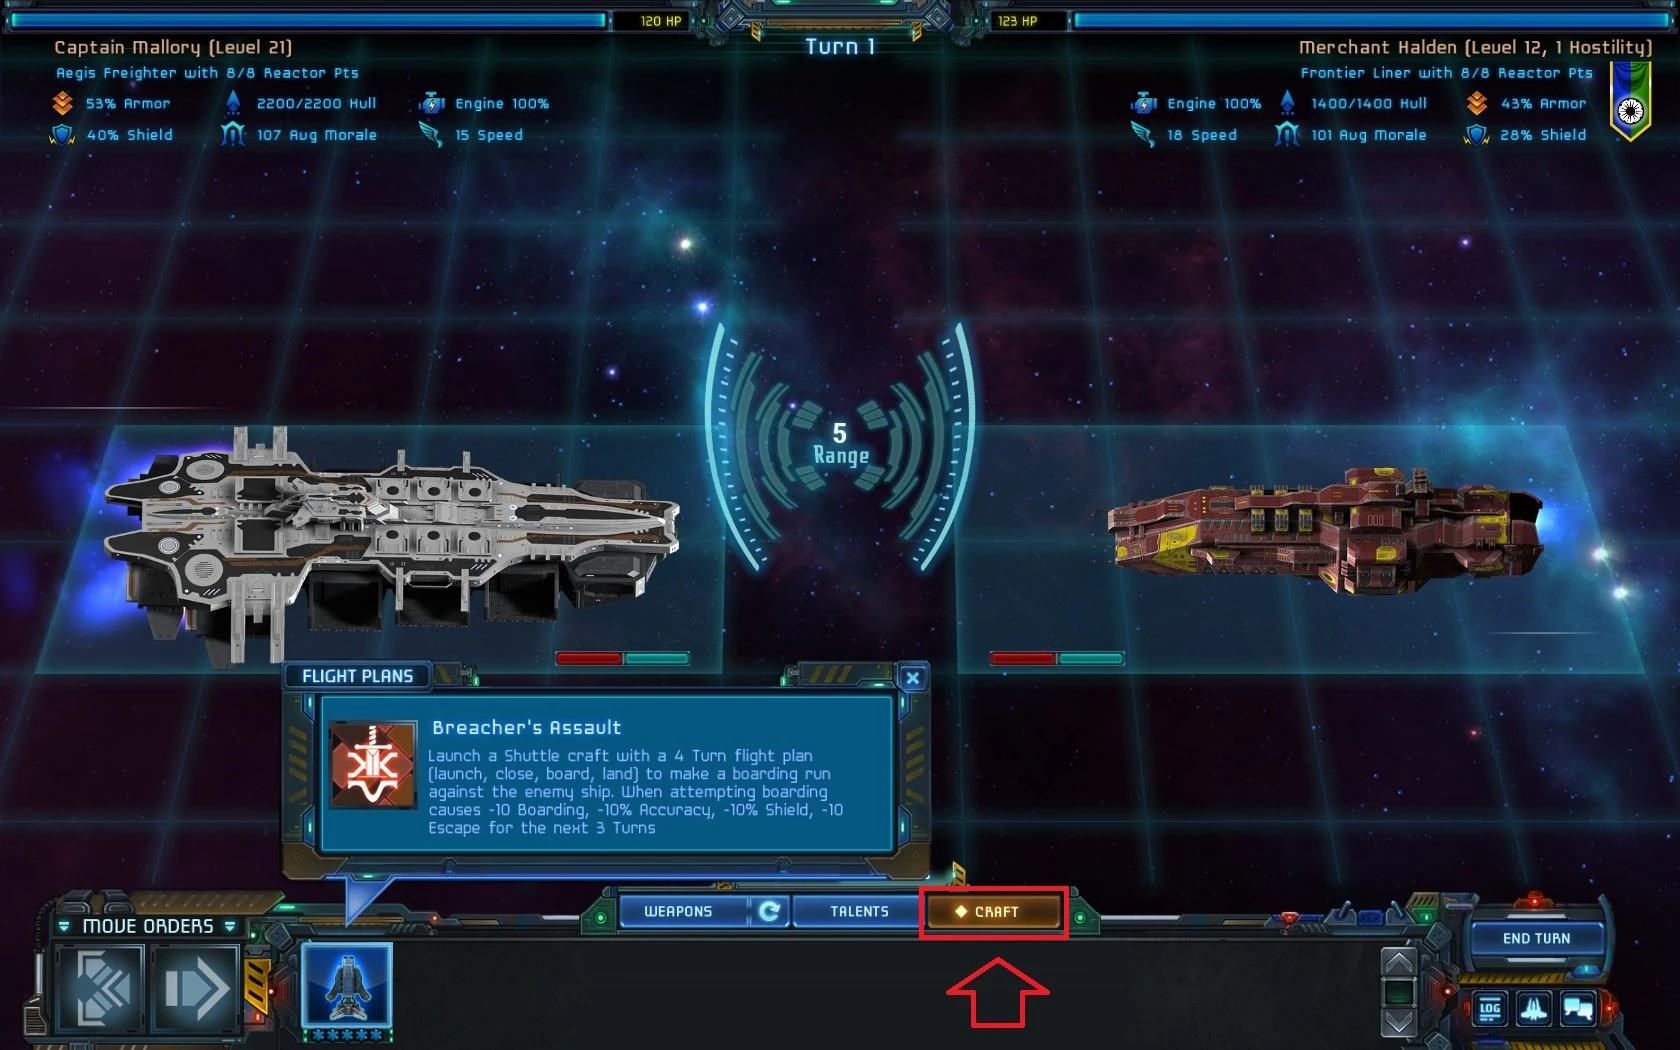
Flight Plans[ | ]
If you are equipped with a launch bay and can support one or more Small Craft, you can select a flight plan for any currently prepared craft. Each flight plan costs 2 RP to launch, but otherwise behaves similarly to talents. These can be launched from any range, and can be relaunched as long as you have enough Water-Fuel to pay for each flight plan.
Flight plans do not count against your limit of 1 talent per turn. If you have 3 operational bays with the Launch capability, 3 small craft prepared, and 3 pilots, you can launch all 3 small craft and play 1 other talent in the same turn. Beware, so can the AI's carriers!

Ship Combat Dice Pools[ | ]
The Skill Pools and ship scores used for ship to ship combat are split into two categories -- those used for Long Range (5 and 4) and those used for Close Combat (3 to 1). Depending on the range between the two enemy ships, a different set of dice are used for each operation.
During ship combat, the dice you roll for each Skill Pool for your ship stats cannot exceed the requirements of your ship's components. If your ship requires 12 Pilot then you can at most gain 12 dice during combat from your crew's Pilot Skill Pool and cannot gain any additional dice. Again, if your crew exceeds the 100% threshold, you do not gain additional dice in combat. (However, outside of combat, the threshold between 100% and 200% grants bonus standard dice. Nothing is ever gained above 200%.)
If the Skill Pool is for Strong Dice (ex. Pilot Skill Pool as Strong Dice, supposing it is higher than Electronics), you receive an equivalent amount of Strong Dice for the Skill Pool of dice. In Ship Combat, unlike other Skill tests like during missions or traveling, you do not receive any additional dice for having a Skill Pool over 100%!
Therefore, when planning for ship combat it is especially important to have at least 100% of your Ship Skill Pool requirements to max the Strong Dice. It is also important to ensure you have a safe amount over the requirement in case you sustain casualties or crew drop out of combat due to low Morale.
Important strategy to note: For non-combat Skill Pools, should your percentages exceed 200%, it is advisable to upgrade your ship components for higher ship requirements (ie. more baseline dice), or consider purchasing a new ship with higher operational skill requirements. For combat Skill Pools, you should start considering upgrades as soon as you have safely exceeded 100%. This makes it even more important to upgrade your ship components for combat.
Notably, if your Gunnery Ship Pool is understaffed, you do not add any Tactics Skill Pool while attacking.
| Strong Dice | Standard Dice | Special | |||||||
|---|---|---|---|---|---|---|---|---|---|
| Attacking |
|
Gunnery Skill Pool Tactics Skill Pool (if Gunnery is not understaffed) |
+25% for firing at optimal range +X% based on the Engine Score comparison (Speed/Agility) | ||||||
| Defending |
|
Electronics Skill Pool or Pilot Skill Pool, whichever is lower Command Skill Pool |
+10% if foe is closer than optimal range for weapon
+15% if foe is further than optimal range for weapon | ||||||
| Escaping
(retreat from Range 4 or 5) |
Engine Speed Navigation Skill Pool Escape Bonus Range Change Bonus |
Command Skill Pool
Electronics Skill Pool |
+X% based on the Engine Speed comparison | ||||||
| Changing Range |
|
Electronics Skill Pool
Tactics Skill Pool |
+X% based on the Engine Score comparison (Speed/Agility) | ||||||
| Boarding |
|
Command Skill Pool / 3
Tactics Skill Pool / 3 Boarding Bonus (Defending against) |
+X% based on the Engine Score comparison (Speed/Agility) | ||||||
- The Escape bonus is present when retreating from range 4 or 5 or maintaining your position while your foe attempts to close the distance.
- Also see Test Scores for a guide on how these pools might be scored and compared. (Note: The Test Scores page is like the Guides: best-effort, and often won't be up to date with the remainder of the wiki.)
Ship Engine Comparison[ | ]
In ship combat, the faster ship (based on engine Speed/Agility) gets a bonus to Range Change (including Boarding & Escaping), Attacking, and Defense. These benefits are based on the relative stats (ratio) of the two ships' engines (higher engine's stat divided by lower engine's stat). Range Changes (and Boarding/Escape) also give different bonuses at long-range (4 and 5) than at short range (1, 2, 3).
Faster/More Agile ship's bonuses[ | ]
| Engine Stat Ratio | Range Change/Escape Long Range (4-5) |
Range Change/Board Short Range (1-3) |
Attack | Defense |
|---|---|---|---|---|
| 3x or more | 35% | 25% | 35% | 35% |
| At least 2.5x | 30% | 20% | 25% | 30% |
| At least 2x | 22% | 14% | 15% | 22% |
| At least 1.5x | 15% | 12% | 10% | 15% |
| Greater than 1x, but less than 1.5x | 10% | 8% | 5% | 8% |
| Equal to or less than 1x | ---- Slower/Matched ships get no bonuses or penalties ---- | |||
Example[ | ]
One ship with an M2400 Chaser engine (27 Speed/30 Agility) is fighting another ship with an M9000 Traveler engine (15 Speed/8 Agility). The engine ratios (and bonuses) are:
- Speed ratio (actions at range 4-5) is 27/15=1.8; which gives the smaller ship +15% Range Change (and Escape), +10% Attack, and +15% Defense.
- Agility Ratio (actions at range 1-3) is 30/8=3.75; which gives the smaller ship +25% Range Change (and Boarding), +35% Attack, and +35% Defense
Defeat and End of Combat[ | ]
Ship combat ends when either party is defeated or successfully escapes. In the case of escape, each ship is left free to resume travel through deep space, though they may have sustained heavy damage and/or casualties.
A ship is defeated in combat under one of a couple of different scenarios. Take these conditions into account to create the best ship combat strategy possible. Resilience to defeat is a critical part of surviving harrowing combat in the void.
- A ship reduced to 0 Hull suffers a hull vent and total collapse. Everyone dies.
- A ship whose Captain is reduced to 0 Hit Points surrenders in battle.
- A Ship whose components no longer provide 5 Pilot Skill Pool points cannot be flown effectively in combat and surrenders. This can be caused when either a ship's Pilot components are so damaged that they can no longer provide Ship Pools, or the crew is so devastated that they can no longer provide the 5 Pilot Skill points to power the working components.
- A Ship whose components no longer provide 5 Ship Ops Skill Pool points cannot be operated in combat and surrenders. This can be caused when either a ship's Ship Ops components are so damaged that they can no longer provide Ship Pools, or the crew is so devastated that they can no longer provide the 5 Ship Ops Skill points to power the working components.
- A Ship whose surviving crew is reduced to less than 20% of their maximum number cannot be operated and surrenders. (Even crew with ultra-low morale are counted as "surviving" for this check. Actual deaths are what matters here.)
- A Ship whose surviving crew is reduced to an average morale of 25 or lower will mutiny against their captain and surrender.
- A ship whose Engine component suffers more than 60% damage loses its ability to maneuver and must surrender.
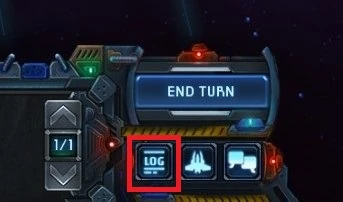
Combat Log[ | ]
In Ship Combat it can be extremely helpful to view the combat log to see the exact results of your rolls and actions not entirely represented in the main screen. The combat log is found in the lower-right hand corner of the Ship Combat screen. The log can be particularly helpful for the following:
- Seeing how close (or far away) your and your opponent's dice rolls were from each other. This can help determine if you should apply (another) defensive talent to avoid likely impacts, even if you safely dodged the hits from the previous round.
- Seeing exactly which components were damaged on your ship and on your opponent's ship from the previous round's shots, small craft, and crippling effects. While you can view your ship's components' statuses with the ship button next to the log, you cannot view which of your opponent's components were damaged without the log.
Component Damage Redirection[ | ]
Details on how components are selected for component damage are not known with exactness.
However, it is known that primary armor components are 35% more likely to be targeted than standard components. Bulkheads, prows, hull plating, and reinforced structures are the only primary armor components. Secondary armor components are 20% more likely to be targeted than standard components. These are composed only of seals, orbital plating, and coatings. All other components are standard components.
Both primary and secondary armor continue to soak component damage with elevated probability until they are 100% damaged. This is notable because all other component effects in the game cease when 60% damage is reached. Note that any +Armor or other bonuses are non-functional at 60% damage, but the remaining component HP will still draw fire 35% (or 20%) more often until it is fully 100% damaged.